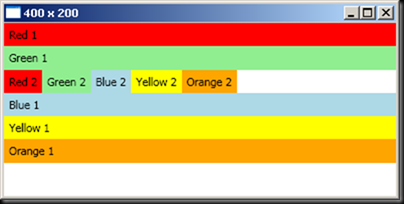
StackPanelPracuje stejne jako ve Windows Forms FlowLayoutPanel. Pri vertikalnim usporadani kazda polozka vyplnuje celou sirku prvku, do ktereho nalezi. Kazdy prvek je vysoky presne tolik jaky je jeho obsah. Vychozi usporadani je vertikalni.
123456789101112131415
<StackPanel orientation="Vertical"> <!-- Vertical is the default --> <Label background="Red">Red 1 </Label> <Label background="LightGreen">Green 1 </Label> <StackPanel orientation="Horizontal"> <Label background="Red">Red 2 </Label> <Label background="LightGreen">Green 2 </Label> <Label background="LightBlue">Blue 2 </Label> <Label background="Yellow">Yellow 2 </Label> <Label background="Orange">Orange 2 </Label> </StackPanel> <Label background="LightBlue">Blue 1 </Label> <Label background="Yellow">Yellow 1 </Label> <Label background="Orange">Orange 1 </Label></StackPanel>
WrapPanel
|
1 2 3 4 5 6 7 8 9 10 11 12 13 14 15 |
<StackPanel orientation="Vertical"> <!-- Vertical is the default --> <Label background="Red">Red 1 </Label> <Label background="LightGreen">Green 1 </Label> <StackPanel orientation="Horizontal"> <Label background="Red">Red 2 </Label> <Label background="LightGreen">Green 2 </Label> <Label background="LightBlue">Blue 2 </Label> <Label background="Yellow">Yellow 2 </Label> <Label background="Orange">Orange 2 </Label> </StackPanel> <Label background="LightBlue">Blue 1 </Label> <Label background="Yellow">Yellow 1 </Label> <Label background="Orange">Orange 1 </Label> </StackPanel> |
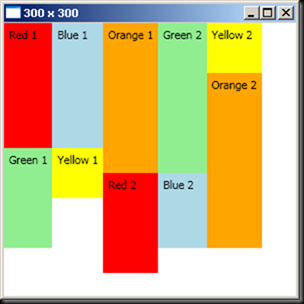
Pri vertikalnim rozlozeni se nejdrive obsazuje leva strana a az pote se postupuje k prave – vzdy kdyz se dalsi prvek jiz nevleze do leve. Analogicky pri horizontalnim se nejdrive obsazuje horni rada a postupuje se k dolni.
|
1 2 3 4 5 6 7 8 9 10 11 12 |
<WrapPanel Orientation="Vertical"> <Label Height="125" Background="Red">Red 1 </Label> <Label Height="100" Background="LightGreen">Green 1 </Label> <Label Height="125" Background="LightBlue">Blue 1 </Label> <Label Height="50" Background="Yellow">Yellow 1 </Label> <Label Height="150" Background="Orange">Orange 1 </Label> <Label Height="100" Background="Red">Red 2 </Label> <Label Height="150" Background="LightGreen">Green 2 </Label> <Label Height="75" Background="LightBlue">Blue 2 </Label> <Label Height="50" Background="Yellow">Yellow 2 </Label> <Label Height="175" Background="Orange">Orange 2 </Label> </WrapPanel> |
DockPanel
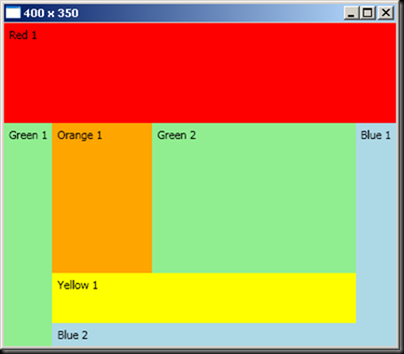
Prvky se skladaji zvenku dovnitr. Posledni prvek vyplnuje celou zbyvajici oblast. Prvky se umistuji do tabu
|
1 2 3 4 5 6 7 8 9 10 11 |
<DockPanel> <Label DockPanel.Dock="Top" Height="100" Background="Red">Red 1 </Label> <Label DockPanel.Dock="Left" Background="LightGreen">Green 1 </Label> <Label DockPanel.Dock="Right" Background="LightBlue">Blue 1 </Label> <Label DockPanel.Dock="Bottom" Background="LightBlue">Blue 2 </Label> <Label DockPanel.Dock="Bottom" Height="50" Background="Yellow">Yellow 1 </Label> <Label Width="100" Background="Orange"> Orange 1 </Label> <!-- default is to fill --> <Label Background="LightGreen">Green 2 </Label> </DockPanel> |
Canvas
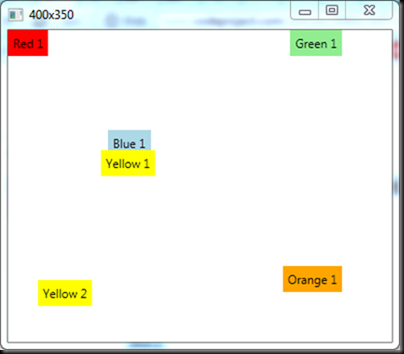
Pro umisteni prvku na presne dane souradnice. Prvky rikaji rodici kde se maji nachazet pomoci vlastnosti Canvas.Left, dale pak Right, Top, Bottom. Top ma vetsi vyznam nez Bottom, Left ma vetsi vyznam nez Right – toto plati kdyz specifikujete treba najednou Top i Bottom. Cili se to vsechno ridi od bodu 0,0. Kdyz neni specifikovana velikost, prvek se roztahne na jeho obsah. Staci zadat pouze jednu hodnotu Canvas.Smer, ta druha hodnota se nastavi automaticky na 0. Prvky definovane nize prekryvaji prvky definovane vyse.
|
1 2 3 4 5 6 7 8 9 10 |
<Canvas> <!-- default coordinates 0,0 from top left; like WinForms --> <Label Background="Red">Red 1 </Label> <Label Canvas.Right="50" Background="LightGreen">Green 1 </Label> <Label Canvas.Top="100" Canvas.Left="100" Background="LightBlue">Blue 1 </Label> <Label Canvas.Bottom="166" Canvas.Right="237" Background="Yellow"> Yellow 1 </Label> <Label Canvas.Right="300" Canvas.Top="250" Background="Yellow">Yellow 2 </Label> <Label Canvas.Right="50" Canvas.Bottom="50" Background="Orange">Orange 1 </Label> </Canvas> |
UniformGrid
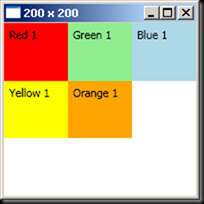
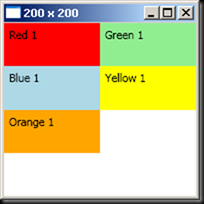
Pokud mate tabulku o stejne velkych radcich i sloupcich. Cim vice prvku to tohoto rodice pridate, tim bude kazdy prvek mensi(a i se stejnou velikosti).
|
1 2 3 4 5 6 7 |
<UniformGrid> <Label Background="Red">Red 1 </Label> <Label Background="LightGreen">Green 1 </Label> <Label Background="LightBlue">Blue 1 </Label> <Label Background="Yellow">Yellow 1 </Label> <Label Background="Orange">Orange 1 </Label> </UniformGrid> |
Grid
Uzivatelsky specifikovana mrizka. Na zacatku musite specifikovat sloupce a radky ktere bude mrizka mit. Pak uz zadavate samotne p rvky, u kazdeho byste meli zadat Grid.Row a Grid.Column. Cisluje se od nuly. Pokud nezadate nic, bude se brat index 0. Opet zde plati ze co je definovano nize prekryva to co je definovano vyse.
|
1 2 3 4 5 6 7 8 9 10 11 12 13 14 15 16 17 18 |
<Grid> <!-- Using default column and row configurations --> <Grid.ColumnDefinitions> <ColumnDefinition></ColumnDefinition> <ColumnDefinition></ColumnDefinition> </Grid.ColumnDefinitions> <Grid.RowDefinitions> <RowDefinition></RowDefinition> <RowDefinition></RowDefinition> <RowDefinition></RowDefinition> <RowDefinition></RowDefinition> </Grid.RowDefinitions> <Label Grid.Column="0" Grid.Row="0" Background="Red">Red 1 </Label> <Label Grid.Column="1" Grid.Row="0" Grid.RowSpan="2" Background="LightGreen">Green 1 </Label> <Label Grid.Column="0" Grid.Row="1" Background="LightBlue">Blue 1 </Label> <Label Grid.Column="1" Grid.Row="1" Background="Yellow">Yellow 1 </Label> <Label Grid.Column="0" Grid.Row="2" Background="Orange">Orange 1 </Label> </Grid> |
Vsechny layouty zde lze pochopitelne logicky do sebe vnorovat. Obrazky a inspirace jsem zpracoval na http://www.codeproject.com/Articles/30904/WPF-Layouts-A-Visual-Quick-Start . Doufam ze autor puvodniho clanku se nebude zlobit za to ze jsem to prelozil do cz-cs.]]>
