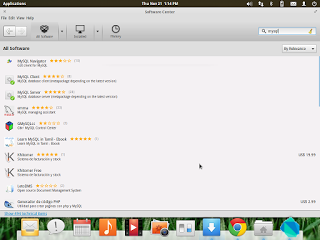
S Dartem jsem se pokoušel spřátelit už několikrát. Bohužel jako pouhá náhrada JS mi přišel trochu nepotřebný ale teď, jak se v Dartu mohou psát i Chrome Packaged Apps a Konzolové aplikace, jejichž výstup se vypisuje v Dart Editoru (nebo určitě někde v Chromu, pokud Dart Editor není spuštěný) jsem se rozhodl se ho naučit. My si dnes neukážeme žádný Hello World program, ale něco trochu složitějšího a totiž práci s MySQL databází. Jsem teď na Linuxu, na Elementary OS Luna, takže screenshoty budou z něho. Nicméně co se týká samotného Dartu, to by mělo být stejné na všech platformách a OS. První co musíme udělat je nainstalovat MySQL, pokud jej ještě nemáte. Já jsem to udělal nejjednodušší cestou a to v Software Centru: 🐬
sudo /usr/bin/mysql_secure_installation :

sunamo@m:~$ sudo /usr/bin/mysql_secure_installation

[sudo] password for sunamo:

NOTE: RUNNING ALL PARTS OF THIS SCRIPT IS RECOMMENDED FOR ALL MySQL

SERVERS IN PRODUCTION USE! PLEASE READ EACH STEP CAREFULLY!

In order to log into MySQL to secure it, we'll need the current

password for the root user. If you've just installed MySQL, and

you haven't set the root password yet, the password will be blank,

so you should just press enter here.

Enter current password for root (enter for none):

OK, successfully used password, moving on...

Setting the root password ensures that nobody can log into the MySQL

root user without the proper authorisation.

Set root password? [Y/n] y

New password:

Re-enter new password:

Password updated successfully!

Reloading privilege tables..

... Success!

By default, a MySQL installation has an anonymous user, allowing anyone

to log into MySQL without having to have a user account created for

them. This is intended only for testing, and to make the installation

go a bit smoother. You should remove them before moving into a

production environment.

Remove anonymous users? [Y/n] y

... Success!

Normally, root should only be allowed to connect from 'localhost'. This

ensures that someone cannot guess at the root password from the network.

Disallow root login remotely? [Y/n] y

... Success!

By default, MySQL comes with a database named 'test' that anyone can

access. This is also intended only for testing, and should be removed

before moving into a production environment.

Remove test database and access to it? [Y/n] n

... skipping.

Reloading the privilege tables will ensure that all changes made so far

will take effect immediately.

Reload privilege tables now? [Y/n] y

... Success!

Cleaning up...

All done! If you've completed all of the above steps, your MySQL

installation should now be secure.

Thanks for using MySQL!

Pak se do MySQL přihlaste:

sunamo@m:~$ mysql -u root -p

Enter password:

Welcome to the MySQL monitor. Commands end with ; or g.

Your MySQL connection id is 57

Server version: 5.5.34-0ubuntu0.12.04.1 (Ubuntu)

Copyright (c) 2000, 2013, Oracle and/or its affiliates. All rights reserved.

Oracle is a registered trademark of Oracle Corporation and/or its

affiliates. Other names may be trademarks of their respective

owners.

Type 'help;' or 'h' for help. Type 'c' to clear the current input statement.

A poté zjistěte jaké máte databáze:

mysql> show databases;

+--------------------+

| Database |

+--------------------+

| information_schema |

| mysql |

| performance_schema |

| test |

+--------------------+

4 rows in set (0.00 sec)
mysql> use test;Database changed
mysql> show tables -> ;
Empty set (0.00 sec)
mysql> CREATE TABLE Users(ID VARCHAR(32), Name VARCHAR(32), Surname VARCHAR(32), DateBorn DATE);
Query OK, 0 rows affected (0.18 sec)
…vložíme do ní data – 2 řádky, abychom viděli že řádků lze vzít neomezeně….
mysql> INSERT INTO Users VALUES (1, "Radek", "Palarcik", -> "1993-4-2");
Query OK, 1 row affected, 1 warning (0.18 sec)
mysql> INSERT INTO Users VALUES(2, "Nikol", "Palarcikova", "1989-06-21");
Query OK, 1 row affected (0.08 sec)
…a na tyto data se podíváme, jak se uložili. Protože jsem začátečník v MySQL, nevím ještě jak nastavit české collation a proto tam je Jan?ik.
mysql> SELECT * FROM Users;

+------+-------+-----------+------------+

| ID | Name | Surname | DateBorn |

+------+-------+-----------+------------+

| 1 | Radek | Palarcik | 1993-04-02 |

| 2 | Nikol | Palarcikova | 1989-06-21 |

+------+-------+-----------+------------+

2 rows in set (0.00 sec)
Nyní se přesuneme do Dartu. Vytvořte si nový projekt Console Application (já jsem si ho pojmenoval DartLearn). Otevřete soubor pubspec.yaml a v závislostech/Dependencies specifikujte balíček sqljocky a uložte (ctrl+s). Znovu se vám sestaví workspace, což může chvilku trvat.
Poté do vytvořeného Dart souboru nahraďte tímto obsahem (pokud jste odškrtli vytvořit šablonový obsah, musíte tento soubor samozřejmě vytvořit (ctrl+n)): 👻 RIP – tenhle server nepřežil ani vlastní hosting.. Poslední věc co musíte nastavit je launcher, abyste tento program mohli spustit. Proto stiskněte ctrl+shift+m a nastavte launcher pro vaši konzolovou aplikaci a váš skript:
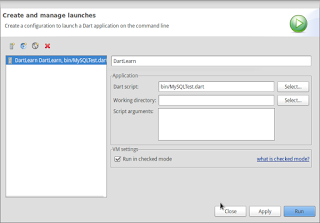
Původně jsem chtěl udělat tuto aplikaci jako webovou, ale při pouhém nastavení launcheru mi Dartium vyhazovalo chybu „The built-in library
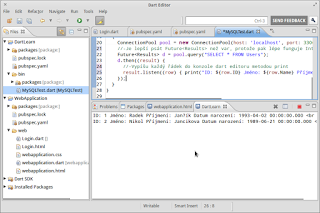
dart:io is not available on Dartium.“ a Apache se mi na Linuxu přes správce softwaru nepodařilo nainstalovat (nezkoušel jsem Synaptic). dart:io je totiž serverová knihovna určena pouze pro server. Spusťte (ctrl+r) a měli byste mít v konzoli data z vaší MySQL DB: 🎯
Přeji vám hodně štěstí s Dartem.